Refilsaum-art - 10/17/19
"Refilsaum" Handout - Laid and couched work"
by Racaire.
NOTE: See also the files: Couching-art,
embroidery-msg, emb-blackwork-msg, P-Emb-Frames-art, emb-linen-msg,
p-x-stitch-art, Blackwork-Emb-art, 8-P-Stitches-art.
************************************************************************
NOTICE -
This article was added to this set of files, called
Stefan's Florilegium, with the permission of the author.
These files are available on the Internet at:
http://www.florilegium.org
Copyright to the contents of this file remains with
the author or translator.
While the author will likely give permission for this
work to be reprinted in SCA type publications, please check with the author
first or check for any permissions granted at the end of this file.
Thank you,
Mark S. Harris...AKA:..Stefan li Rous
stefan at florilegium.org
************************************************************************
You can find more work by this author on her website
at:
"Refilsaum" Handout
(laid and couched work)
v.2.0
by Racaire
Shire Ad Flumen Caerulum
Kingdom of Drachenwald
Many thanks to Jane Stockton (Laren) for her help, her
inspiration & enthusiasm.
Use of Refilsaum embroidery:
In the past this type of embroidery was mainly used
for wall hangings.
Large areas could be covered very quickly with this
technique. Because of the threads used at that time and the big distances
between the "holding stitches"- the threads could easily catch on
things and therefore this technique was not so good for day to day wear or use.
Different types to
use Refilsaum:
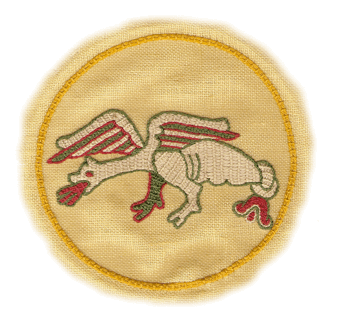
Use I) Figures:
embroidered
Background:
empty
Examples:
Bayeux-tapestry
(11th century)
(Ground
fabric: Linen, Embroidery: Wool)
Source of this picture: unknown
Use II) Figures:
empty
Background:
embroidered
Examples:
Wall-tapestry
Iceland (14th century)
(Ground
fabric: black Wool, Embroidery: - (Wool?))
Source of this
picture: "Das Stickereiwerk" written by Marie Schuette and Sigrid
Müller-Christensen
Verlag Ernst Wasmuth,
Tübingen
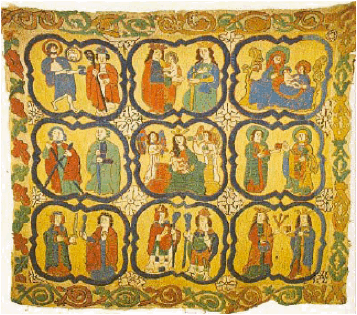
Use III) Figures: embroidered
Background:
embroidered
Example
I: Marien-tapestry
Iceland (14th century)
(Ground
fabric: Linen, Embroidery: Wool, white Linen)
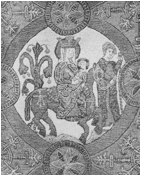
Source of this picture: "Das Stickereiwerk"
written by Marie Schuette and Sigrid Müller-Christensen
Verlag Ernst Wasmuth,
Tübingen
Example
II: Altar
Frontal (Draflastadir Church) Iceland (16th century)
(Ground
fabric: Linen, Embroidery: Wool, Linen)
Source of this
picture: http://medieval.webcon.net.au/loc_scandinavia_iceland.html
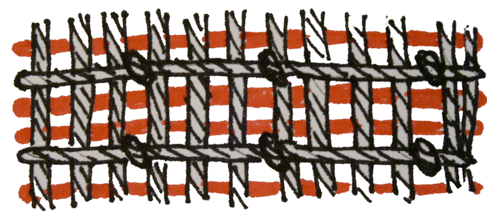
Refilsaum Technique:
|
A |
A) First make the
"basic"-threads: Start every "basic"-thread moving sideways
next to the point where the last thread left the surface… |
|
B |
ð B)
…that's all what you see of the "basic"-threads at the back - most
of the thread stays on top of the embroidery. |
|
C |
C) Finished laying 12
"basic"-threads. |
|
|
D) After the
"basic"-threads the holding threads have to be done. |
|
E |
E) Many technique
descriptions for the "Bayeux" stitch show that first all the
holding stitches are made and than couched… …but I prefer to make a holding stitch and couch it
while "going" back to the beginning of the holding stitch and so
on… |
|
F |
F) Repeat it until
you get to the other end of the basic threads... |
|
G |
G) A look at the back
of the couched holding threads. |
(http://racaire.blogspot.com/2005/12/photo-documentation-of-my-bayeux.html)
Other techniques used with Refilsaum:
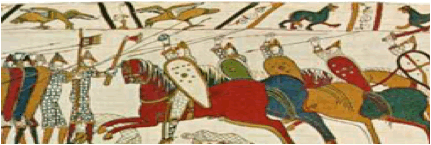
Bayeux-tapestry:
The outline of the motives is done in stem stitch. Font, faces, hands,
figures & other motives are done in stem-, chain-, and split stitch.
Nearly the whole area-wide embroidery is worked in
Refilsaum only some small motives are worked with another couching stitch
technique.
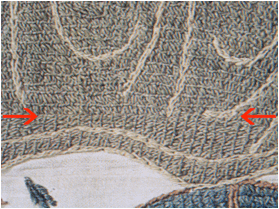
You will find a direction change of the Refilsaum
inside some sections - because usually the "basic"-threads follows
the longest distance. Example: the direction of the "basic"-threads
of the leg is different than the "basic"-threads of the body, but all
threads belong to the same section.
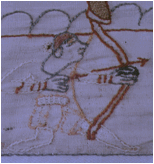
Source of this picture:
"Der Teppich von Bayeux" - David M. Wilson
Bibliography:
Books: "Das
Stickereiwerk" Marie
Schuette, Sigrid Müller-Christensen
Verlag Ernst Wasmuth Tübingen 1963
"Der
Teppich von Bayeux" David
M. Wilson
Sonderausgabe 2003, Parkland Verlag, Köln,
ISBN 389340040-0,
(ISBN 0500251223 in English)
"The
Embroidery Stitch Bible" Betty
Barnden
(Krause Publications, Reprint 2004,
ISBN 0-87349-510-1)
Internet: "In Praise
of the Needle" Jane
Stockton - http://needleprayse.webcon.net.au
Handout "Scandinavian Laid and Couched Cushion"
"historical needlework resources" http://medieval.webcon.net.au
Concerning the photos in the section: "Different
types to use Refilsaum:" – photos marked with "source unknown" –
the copyright holders are not known. If you know the copyright holders please
write me a message that I can add the information.
Handout "Refilsaum" - Appendix
FAQs:
Holding classes can
be very interesting and during some of this classes additional questions
concerning the technique occurred - I hope that the new section
"FAQs" helps to solve this additional questions.
1) Laying the "basic"-threads:
Lay the "basic"-threads from one border
("A") of the section to the border of the opposite side of the
section ("B")
2) Direction of the basic threads:
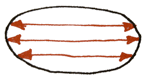
As long as I don't want to make a special surface
pattern with this technique, I lay the threads over the longest distance or in
the direction where I think that it will take the shortest time to finish the
section. It's faster to lay some very long "basic"-threads, than a
lot of short "basic"-threads and afterwards laying the holding
threads and couching them is not as labour-intensive and time-consuming as
laying the "basic"-threads.
The direction inside one motive can change from one
section to the next and also inside a section.
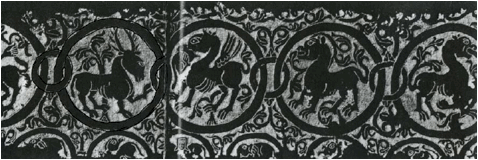
3) Changing directions inside a section:
Sometimes it can be helpful
to change the direction of the "basic"-threads inside a section and
yes, it's period to do this!
To get a smooth changeover between the two parts I
make one more holding thread over the changeover-line of the new section and
couch it.
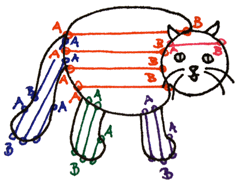
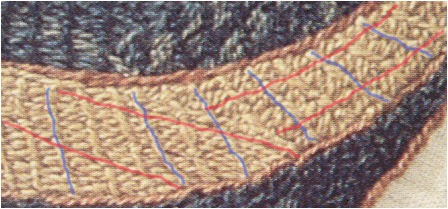
Some examples for changing directions inside a section
found in the Bayeux-Tapestry:
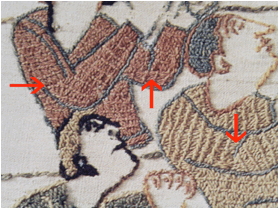

Source of this pictures: "Der Teppich von
Bayeux" - David M. Wilson
…and this examples inspired me for my "how to
work round shapes":
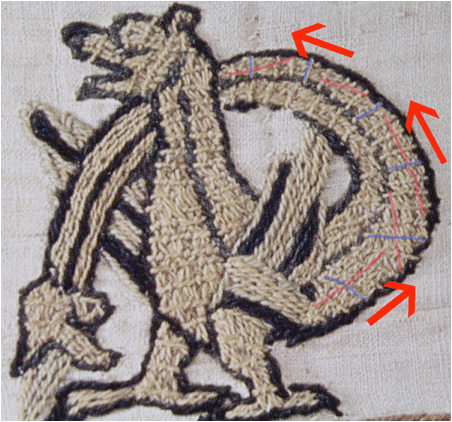
Source of this pictures: "Der Teppich von
Bayeux" - David M. Wilson
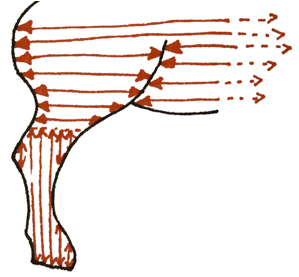
(red lines:
direction of the basic threads, blue lines: direction of the holding
threads)
3.1) My "how to work round shapes":
|
This is my
interpretation of filling round shapes (based on pictures from the bayeux
tapestry) |
|
|
|
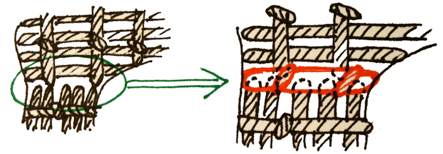
Step 1: The second line of
basic threads has to be worked staggerd to get round the corner -> than the next holding stitches can be made -> the holding stitches can be couched... |
|
|
Step 1.1: make a new "holding stitch" |
|
|
Step 1.2: "couching" the holding stitch (than again step 1.1 and 1.2 until you can continue
with Step 2) |
|
|
Step 2: for the next basic
threads I have to look how much I can move (condition: the thread should stay
as straight as possible) |
|
|
…than continue with Step 1.1 and 1.2 and additional
with Step 2 when you need more basic threads until… |
|
|
…until the section is filled. |
|
|
Detail |
(http://racaire.blogspot.com/2005/12/bayeux-stitch-and-round-shapes.html)
4) Filling the background:
Sometimes, if there is a big
difference between the colour of the background and the thread, the background
can shine through more than normally. I found two possible ways for me for
'cheating':
4.1) New threads behind the
"basic"-threads:
This technique is very
simple - you just add new threads behind the "basic"-threads.
The threads you use should
have the same colour like the thread used in the section.
You can use as many threads
as you like as long as they fit into the room between the holding stitches
without disturbing the surface.
4.2) Adding
additional "basic"-threads:
Working this technique I
prefer to start underneath one of the holding threads and to end underneath a
holding thread (or to start/end at the edges of a section).
The new thread should also
have the same colour like the thread used for the section.
Again you can add as many threads as you like or need -
normally I use this technique wherever a "hole" is visible in the
surface of the "basic"-threads after I finished the section.
Sometimes I use technique
4.1, sometimes 4.2 or both – I would recommend to use the technique that fits
best for your work and functioning.

Good luck for your
embroidery projects & don't forget to have fun while working at them!
Please don't hesitate
to contact me if you have further questions concerning this technique.
Yours in Service
Racaire
------
Copyright
2010 by Racaire. <ego at at racaire.at>. Permission is granted for
republication in SCA-related publications, provided the author is
credited. Addresses change, but a
reasonable attempt should be made to ensure that the author is notified of the
publication and if possible receives a copy.
If
this article is reprinted in a publication, please place a notice in the
publication that you found this article in the Florilegium. I would also
appreciate an email to myself, so that I can track which articles are being
reprinted. Thanks. -Stefan.
<the end>
 Formatting copyright © Mark S. Harris (THLord Stefan li Rous).